
Measure Brightness
What to do:
These three tutorials are essential training for creating your light curve. Please watch them before you begin
Detect a Planet
Chart the brightness of your star system over time. Using the images you have taken with the telescope, see if you can detect a planet orbiting its star. The video tutorial will get you going. For each image you’ll need to:
Inspect Your Telescope Images:
- Make sure you are logged in.
- Select "My Requests" to see your images.
- Ignore any images that have clouds or other major defects. Work only with images that have a dark sky and plenty of stars.
Even with the most world's most powerful telescopes, alien solar systems appear as just a single white dot: This is light from the star.
What's so cool about looking at white dots?
At first, analyzing white dots might seem a bit boring... until you realize that each dot is a star that may be orbited by strange new worlds. The only way we humans can turn a single dot of light into a story—an entire world's portrait—is to decode what the light can tell us. Welcome to the "one-pixel club!" This is the ultimate detective work.
Move circles over any star and see how it is magnified on the zoom popup.
Your telescope images are made of tiny dots or squares called pixels ("picture elements"). The brightness of each pixel is represented by a number, running from 0 (black) to 4095 (white), with thousands of gray levels in between. When you measure the brightness of your star, you will be measuring these number in the underlying image file. The brighter the star, the higher the number. Your own eye can only distinguish about 256 gray levels—so that is all that the computer monitor displays. In fact, you can't detect the dimming of the star by eye—it's just too small a change. But, with the tools, you'll be using... no problem!
Calibrating the Telescope
The telescope's light sensors add electronic noise. The noise in the darkness was subtracted from the image so it won't interfere with your measurements. This calibrated your instrument readings to zero.
Finding your star among many is hard, even for professional astronomers. Take your time.
- Locate your target star by opening the Finder popup.
- The star you'll investigate, the Target Star, is labeled with a T and a little arrow. The comparison stars are labeled with a C.
- Before you move the Finder, see if you can match up the bright starts in the Finder with the bright stars in your image.
- Drag the chart over your image and position it so that the stars in the chart align with the stars in your image. (The chart becomes transparent when it's over your image.)
- Close the Finder. You can measure your star even with the Finder on. But it is a good idea to close the chart when making a measurement, and then toggle the chart back on and off to make sure you are measuring the right star.
*Key Ideas:
- Light coming from any object contains information about the object.
- In any experiment, many factors may interfere with the thing you are trying to measure.
Measuring Brightness
First measure your target star.
- Make sure that you click in the Target star checkbox and drag (desktop) or click the arrows to move the yellow circle (mobile device)
- Toggle the Zoom tool open to make sure you center the star within the yellow circle as best as you can.
- You are measuring the total brightness of all the pixels within the yellow circle.
- Click on the next checkbox to commit the measurement.
Moving counter-clockwise, measure the comparison stars.
- Select the each comparison star checkbox and drag (desktop) or click the arrows to move the the circle over the star.
- Toggle the Zoom tool open to make sure you center the star within the yellow circle as best as you can.
- When you are finished with the two comparison measurements, click the next checkbox to take the first of the night sky measurements.
Many factors beyond your control can influence your measurement of the star's brightness. For example, a star appears dimmer as you view it lower in the sky because its light passes through more atmosphere. (Think of the sun setting compared to the sun at noon.) Or, imagine a thin cloud or haze passing by, making the star dim for a while. How will you distinguish a passing cloud from the transit of an alien world? The secret is to also measure some comparison stars in your image. Anything that happens to one star should happen to the others, except for the transit you are looking for. You'll measure two comparison stars and take their average. Then you'll graph your star's brightness compared to this average. This relative brightness should only change if there is a transit!
*Key Idea:
In many investigations, a comparison group can help you correct for factors that might interfere with your measurements.
Correcting for the Sky's Brightness
Notice the numbers are not zero when you place the circle on the dark part of the night sky. The night sky is not completely black. This stray light comes from nearby cities, the Moon, and even sunlight scattered off dust floating in our solar system. Pick out two spots in the dark sky by moving the circles in the black of your image. The night sky would add to your star's apparent brightness. We'll have to measure it and subtract it. You'll do this by measuring two areas of the night sky, near your target star. You'll take the average and then subtract the average from your star measurements.
*Key Idea:
In any investigation, many things may affect your measurements besides the thing you're interested in! You'll need to eliminate or correct for these interfering factors.
 Target
Two Comparison Stars
1.Two Points of Night Sky
1.Relative Brightness
Click checkboxes to move circles with arrows.
Measurements Message
My Data
| Image Name | Time of Night | Relative Brightness |
|---|
This is the graph of your observations. It shows how the relative brightness of your star changed over the course of the evening. Each dot represents your measurements on a single telescope image.
Your own data may not be visible at first. Use the sliders to expand or compress the graph scale to your liking. Use the gray arrows to slide the y-axis up or down. This does not change the data values—only the way they are displayed.
As you make more and more measurements, does a pattern start to emerge?
*Key Idea:
In most investigations, the data you collect are incomplete. You could always have more data. The key is to collect enough data to be confident that you can detect a clear pattern.
You'll learn more about this in the Interpret and Share page.
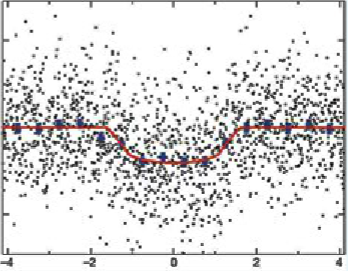
Did you think your data would all fall on a simple curve? Welcome to the real world! You are working at the frontiers of discovery, where messy data are the norm.
The graph shows the data from a NASA's Kepler Space Mission, designed to search the Earth-sized planets. The Kepler telescope is 100 times more sensitive than the telescope in this project—and it can detect planets 10 times smaller than in this project. And yet Kepler scientists have to contend with messy data that probably looks very similar to yours.
By looking at how the brightness changes between each of your measurements, you can figure out what may have happened during the evening.
Does your target star brightness vary a lot? Clouds and haze may come and go, and the star is always rising or setting. That is why you need comparison stars! By dividing by the comparison star brightness, you are factoring out the influences that afffect every star equally.
Does your night sky brightness vary a lot? That may be a sign that thin clouds may have come and gone. Clouds or has can reflect light from the ground, so they make the night sky appear brighter.
The altitude feature shows how high your star was above the horizon
Select altitude to see whether your star was rising or setting, and to see how far above the horizon the star was for each image you measured.
The altitude runs from 0 degrees (the horizon) to 90 degrees (directly overhead). As the star gets lower in the sky, it appears dimmer and redder. (Think of our own Sun as it sets.)
Generally, the higher the star, the better and more consistent your data will be. When you capture the image of a star near the horizon, there may be more clouds, haze, and light from nearby cities that can interfere with your measurements. Was your star at an altitute of, say, 35 degrees or lower at some point during the evening? Are the data more scattered there?